Implementation basics
If you are not familiar with Vue.js, first learn about the basics in Section Vue.js.
Project file structure
By default, a magpie project has the following file structure:
# top-level configuration files
# these are usually not interesting
.eslintrc.js
.gitignore
.prettierrc.js

# These files are related to npm
# and list the dependencies that we need to build and run our experiments
package.json
package-lock.json

# This is the vue.js configuration
# Usually you won't need to touch this file
vue.config.js

# This is where npm installs the dependencies of your project
# You usually don't need to look in here
node_modules/

# Files for including in your experiment
public/
  # your image files
  images/
  # your video files
  video/
  # your audio files
  audio/

# Data (e.g.,csv files), with information about how to
# realize individual trials, e.g., which pictures to show etc.
trials/

# The source code that realizes your experiment
# The main work happens here
src/
  # magpie-specific configuration
  magpie.config.js
  # set-up code for Vue.js, usually you don't need to touch this
  main.js
  # The main file for your experiment.
  App.vue
The Experiment component
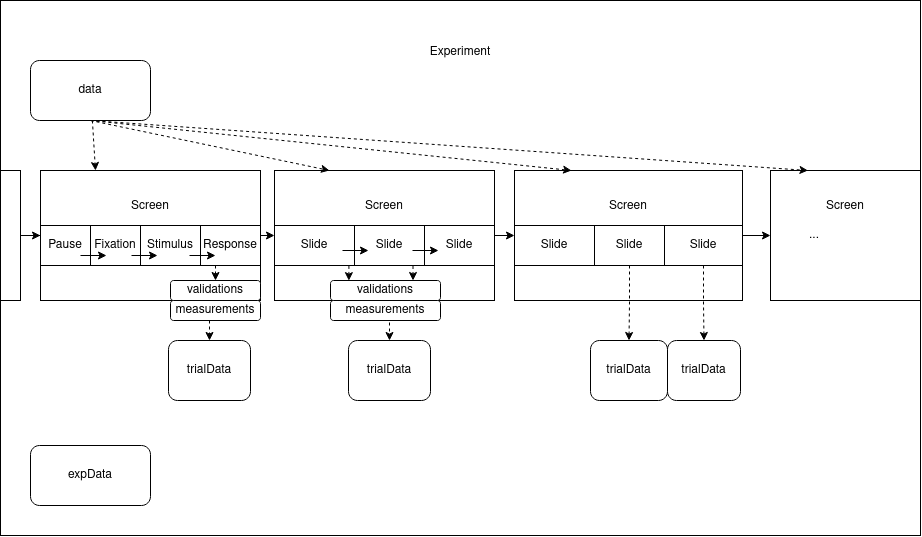
The structure of the component tree resembles the above conceptual schema of an experiment, using screens and slides, discussed in Section Screens & Slides.
The root component of the component tree will always be the one in file App.vue in your project src directory.
The top-most component in the <template> section of your App.vue should be an Experiment component, which initializes magpie and makes sure you can use all magpie functionality in your experiment.
<template>
    <Experiment>


    </Experiment>
</template>
The Screen components
Below the Experiment component, you define your screens. You can use ready-made screens, which magpie supplies for convenience, such as the InstructionsScreen, but you can also use the flexible Screen component to build your own custom screens.
For a list of available ready-made screens see here.
<template>
    <Experiment>

        <InstructionScreen :title="'Welcome'">
          <!-- ... -->
        </InstructionScreen>

        <Screen>
            <!-- ... -->
        </Screen>

        <Screen>
            <!-- ... -->
        </Screen>

        <!-- ... -->

    </Experiment>
</template>
$magpie
Magpie also supplies a magic variable called $magpie, which gives you access to many utility functions. These include methods to change slides and screens, mouse and eye tracking as well as a messaging socket to communicate with other running sessions of the same experiment. It is always available as a variable in all components.
A minimal example
This is a simple example of how your experiment code could look like. The following experiment implements three tasks presenting an image and a question with a rating slider. The details of this code will become clear after reading the next sections.
<template>
  <!-- The title prop will be used for the browser tab title -->
  <Experiment title="magpie demo">

      <!-- This is the welcome screen -->
      <InstructionScreen :title="'Welcome'">
        This is a sample introduction screen.
        <br />
        <br />
        This screen welcomes the participant and gives general information about
        the experiment.
        <br />
        <br />
        This mock up experiment is a showcase of the functionality of magpie.
      </InstructionScreen>

      <!-- We iterate over our experiment trials -->
      <template v-for="(rating_task, i) in sliderRating">
        <!-- and display a screen with a slider rating task
             using the built-in SliderScreen component -->
        <SliderScreen
            :key="i"
            :left="rating_task.optionLeft"
            :right="rating_task.optionRight">
            <template #stimulus>
                <!-- Here we populate the stimulus slot with an image stimulus -->
                <img :src="rating_task.picture" />
            </template>
        </SliderScreen>
      </template>

      <!-- This screen will ask some optional questions about the
           participant's background, like age, gender etc. -->
      <PostTestScreen />

      <!-- While setting your experiment mode to 'debug' in the magpie config
       this screen will show the results of the current experiment directly. Once you switch to directLink or prolific
       this screen will submit the results to your magpie backend -->
      <SubmitResultsScreen />
  </Experiment>
</template>

<script>
export default {
  name: 'App',
  data() {
    return {
      sliderRating,
    };
  }
};

// Here we define the independent variables for our experiment
// we could also use a separate csv file for this purpose

const sliderRating = [
  {
    picture: 'images/question_mark_02.png',
    question: 'How are you today?',
    optionLeft: 'good',
    optionRight: 'bad'
  },
  {
    picture: 'images/question_mark_01.png',
    question: "What is the weather like?",
    optionLeft: 'good',
    optionRight: 'bad'
  },
  {
    QUD: 'Here is a sentence that stays on the screen from the very beginning',
    picture: 'images/question_mark_03.jpg',
    question: "How was your breakfast?",
    optionLeft: 'good',
    optionRight: 'bad'
  }
];
</script>